1. Open 3ds max and draw teapot with 10 segments ( You may use any object )
2. Now open material editor by pressing M on keyboard, and select any material slot, give it name Gold and select shader Phong in place of Blinn. Do setting like Specular Level = 68 and Glossiness = 19. In the diffuse map add Falloff and do the setting as shown below
Fallof Curve
In the first falloff map add another Falloff (2nd Falloff)with these setting
1st color Red=252 Green 154 Blue 0.
And Curve as same as 1st fallof map.
3. Go back, copy diffuse map and paste into selfillumination as instance, for realistic look and reflection add raytrace in the reflection map with value 20, our gold material is ready. Apply to the object.
overall maps.
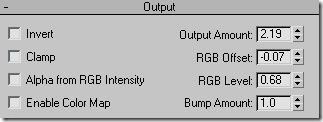
4. For Copper material do the same as did for Gold material (Step 1 to 3), Goto 2nd falloff and just do changes in the output as shown
apply to 2nd teapot and render .
Realistic Gold and Copper Material.


0 التعليقات:
Post a Comment