| For this tutorial we assume that you have the basic knowledge of the 3D Studio MAX surface. For this tutorial no plugins are required! We have created the scene with 3D Studio MAX 2. 1. Start MAX and reset it! 2. Go to "Create - Helpers - Atmospheric Apparatus" and create a SphereGizmo with a Radius of 100. 3. Now go to "Rendering" and select "Environment". 4. Here click on "Add" and select "Combustion". Now it is necessary to apply the Combustion to the gizmo. 5. In the rollout "Combustion Parameters" click on "Pick Gizmo" and select the CylGizmo in any Viewport. 6. Use the following settings... The Explosion-settings (not in the picture) is necessary for animated explosions - here you can set start- end endtime of the explosion by clicking on the "Setup Explosion" button. 7. ...to receive this picture. 8. This effect is only renderable in the perspective or camera viewports. |
Explosions Tutorial
Creating a Foggy Scene in 3D Studio MAX using "Fog" and "Volume Fog"
Creating a Foggy Scene in 3D Studio MAX using "Fog" and "Volume Fog"
By Stealth Snake | 3D Studio Max | IntermediateThis tutorial will teach you how to create a foggy scene in 3D Studio Max. I applied this effect to the ending result of my previous tutorial about Texturing (Using UVW and Unwrap UVW). We will create our scene using two atmospheric filters: "Fog" and "Volume Fog". It is possible to create a foggy scene using one of these alone, you shall be able to experiment with these on your own once you are done with this tutorial. We are using this model (MAX File) in our tutorial, please download it to follow this tutorial.


Before and After - Click to enlarge.
Before and After - Click to enlarge.
It is necessary to explain the difference between our two effects. Fog is the more generic effect which applies to the whole scene in a constant level, you have a relatively less amount of control over this effect. On the other hand, "Volume Fog" generates an inconsistent flow of clouds through out the given 3D space. "Volume Fog" requires a container to which we apply it to, this sort of container is called Gizmo.
Adding the "Fog" atmospheric effect
Applying the standard "Fog" effect is straightforward using the Environment and Effects window. Open up this window by hitting 8 on your keyboard. Scroll down to the Atmosphere rollout from where you can click on Add to find the required effect.

You can simply apply the effect using the preset configurations, however, I did make some changes to the parameters as could be seen in the image below, you can use these instead of the presets and then experiment with these on your own to get your personally desired result.
You may render your scene at this point to acquire a scene similar to the one below.
Adding the "Volume Fog" effect
Unlike the Fog effect, Volume Fog generates a less synthetic looking environment by having an inconstant density volume of fog. Adding "Volume Fog" requires having a container, or as 3DS calls it, "Gizmo". To create a Gizmo go to Create>Helps>Atmospherics>Box Gizmo. You will then have to draw your Gizmo in the place where you want to have your Volume Fog, we want to have it all around the house in our tutorial. Enlarge the image below to see how I did it.
We will now fill our container with our Volume Fog, access the Environment and Effects window, you can press 8 on your keyboard to open it if you closed it. Scroll down to the Atmosphere rollout and click on Add, select Volume Fog from there. Now, this will have to be assigned to our Gizmo. Look for the Volume Fog parameters rollout, click on the Pick Gizmo button that you'll find there and simply select the Gizmo from the scene.
Assign "Volume Fog" to "Gizmo Box". Click to enlarge.
The Volume Fog default parameters are not too bad, you may want to play around with them though to have it look in your own way, you can use the same values that I used as seen in the image below.
This should do the trick, but before you render your scene I suggest that you deactivate the previous effect so that you can clearly see how different it is from the normal Fog effect. You can deactivate the first effect by accessing the Environment and Effects window once again, and this time simply unchecking the Active checkbox to hide your effect. Hide the first effect that we created, Fog. Render your scene afterwards.
Once you are happy with setting of the both fogs setting, hit render and see you awesome fog effect on your scene. But make sure you activate them first.
This concludes our tutorial, you can activate both effects and render the scene once more. You should play around with the parameters to see what values work best for your work. I hope that you learnt something new by reading this tutorial. If you need any more help feel free to drop at Oman3D Forum.

End result. Click to enlarge.
End result. Click to enlarge.
-End of Tutorial
Modeling Golf Ball in simple way

1. Create a box with follwing parameters.
=
2. Now apply spherify modifier on it with 100% value, and convert it into editable poly.
3. By selecting the polygon selection select all the polygons, and apply inset with the following setting:
Our object now look like this .
4. With the same selection apply Extrude with these setting.
5. Now apply Turbosmooth modifier with Iteration 2, and our golf ball is ready .
You may also use Geospher in place of box for different ball shapes.
Mushroom modeling tutorial – 3d max
In this tutorial we will learn how to quickly build a mushroom shape. The steps can be further simplified, however our main goal is to have a nice flexible mushroom object.
MODELING & TEXTURING IN 3DS MAX
In this tutorial we are going to make a Rack in 3ds Max and we will give texture of wood on this rack for giving the originality to the rack.
Here we used the Box tool only to make rack. We will make rack by adjusting the boxes in the shape of a rack. And then we will give the texture of wood.
[1] -: First of all open the 3ds max and for open that the instructions are given below:
Start [ All programs [ Autodesk [ Autodesk 3ds Max 8 [ 3ds Max 8, and click.
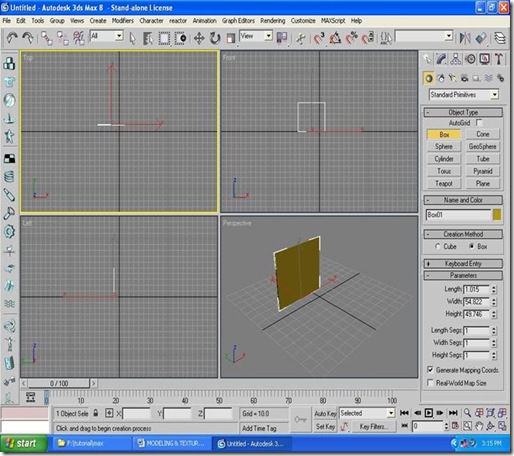
[2] -: Then you will get that kind of application in 3ds Max 8.
[3] -: Now pick the Box tool from Standard Primitives in Geometry from the right side in your max and draw a box in any view in shape of the back support of rack.
[4] -: Now draw two boxes for the sides of the box and adjust these boxes at the sides.
You can see the example below:
[5] -: Then draw two more boxes, one for the base and one for the top and adjust these boxes at their place.
And the example is given below:
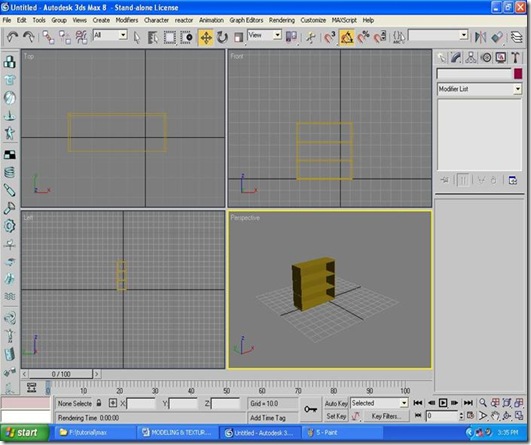
[6] -: Now draw two more boxes for the partition, between base & top and adjust those at their places.
The example is given below:
Now your rack is ready and now we have to give texture on the rack.
[7] -: Now press the “M” key to open the popup window of Material Editor.
[8] -: Now click on diffuse slot and get another popup window of Material/Map Browser.
[9] -: Then double click the Bitmap and browse your wood texture for your rack.
Get your wood bitmap from the path
And click Open after selection the Bitmap.
[10] -: Then you will get that bitmap on a grey slot and then click on “assign material to selection". It will give the wood texture to your rack. And you’ll have to give the texture one by one on every box.
Now close the popup window of Material Editor.
[11] -: Now press the key “F9” for rendering and it will open another popup window which will show your rack with original look of texture.
Subscribe to:
Comments (Atom)


